How do I import a Shapefile of my site boundary?
Most projects start with an existing site boundary — from a client, a government dataset, or a previous survey. This guide covers importing that boundary into TerraSitu as a GIS layer.
Before you start
You'll need:
- A Shapefile containing your site boundary polygon
- All component files:
.shp,.dbf,.shx, and ideally.prj - A
.ziparchive containing those files (required for Shapefile import)
If you have your boundary in another format (GeoJSON, KML, etc.), you can skip to Step 2.
Step 1 — Prepare the Shapefile zip
In Windows Explorer or Finder, select these files and compress them into a single .zip:
site_boundary.shp
site_boundary.dbf
site_boundary.shx
site_boundary.prj   ← include this if available
Warning: The
.zipmust not contain subdirectories. All files should be in the root of the archive. If you're on Mac, avoid using the "Compress" option on a folder — it may nest files inside a subfolder. Instead, select all the individual files and compress them.
If you don't have a .prj file, TerraSitu will assume the data is in WGS84 (EPSG:4326). If your shapefile is in a projected CRS (e.g. GDA2020 MGA Zone 55), the import will fail or display incorrectly. Generate a .prj using QGIS: Layer Properties > Source > Generate .prj.
Step 2 — Import the layer
- Open your Site detail page
- Click the Map tab
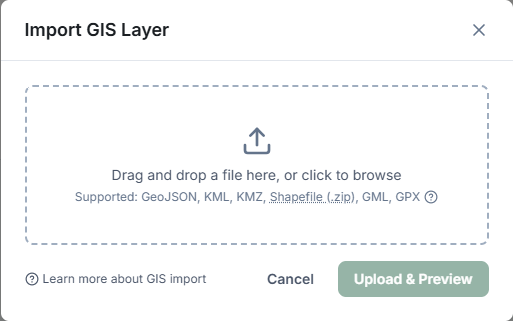
- Click Import GIS Layer
- Drag your
.zipfile onto the upload area, or click to browse - Click Upload & Preview
The map will show a preview of your boundary. Check that it falls in the correct location before confirming.
Step 3 — Confirm the import
- Give the layer a name — e.g. "Site Boundary — Lot 42 DP 123456"
- Add an optional description with the data source (e.g. "NSW Land Registry, 2024")
- Click Confirm Import
The layer is now saved to the site and will be included in all survey packages synced to mobile.
Troubleshooting
"Reprojection failed" error
Your data may be in an unsupported CRS, or the .prj may not match the actual CRS of the data. Open the Shapefile in QGIS, check the CRS, and re-export to GDA2020 or WGS84 before importing.
Boundary appears in the wrong location
This usually means the CRS was not detected correctly — the .prj file is missing or incorrect. Check the CRS in QGIS (right-click layer > Properties > Source) and correct it.
File too large The maximum import size is 100 MB. For complex boundaries (e.g. a large native title claim area with thousands of vertices), simplify the geometry in QGIS before importing.
Wrong geometry type imported If your Shapefile contains multiple geometry types (points, lines, and polygons), TerraSitu imports all features. Use the layer toggle to check what was imported, and if needed, split into separate files by geometry type before importing.
Related Articles
- Importing GIS data — Full reference for all supported formats and import options
- Working with the map — Managing layers after import
- Creating a project — Setting up sites with boundary data